
Jira Software is one of the top agile project management tools used by teams to plan, track, release and support world-class software with confidence. It is the single source of truth for your entire development lifecycle, empowering autonomous teams with the context to move quickly while staying connected to the greater business goal. Whether used to manage simple projects or to power your DevOps practices, Jira Software makes it easy for teams to move work forward, stay aligned, and communicate in context.
This tutorial will guide you how to configure Jira server with Nginx and Cloudflare.
Note: The same for Confluence.
Set application path
Set your Jira application path (the part after hostname and port). To do this in Tomcat (bundled with Jira), edit <Jira-Install>/conf/server.xml.
nano /opt/atlassian/jira/conf/server.xmlLocate the “Context” definition:
<Context docBase="${catalina.home}/atlassian-jira" path="" reloadable="false" useHttpOnly
If you set the base URL like jira.your-domain.com, change the path to the below:
<Context docBase="${catalina.home}/atlassian-jira" path="/" reloadable="false" useHttpOnly="true">
Restart Jira and verify whether it can be accessed on the base URL. You may receive some errors about the dashboard being incorrectly configured, we’ll fix this in the next section.
Configure the Connector
Configure the HTTP connectors so we have one serving as a proxy connector and another for troubleshooting. This is done in the same <Jira-Install>/conf/server.xml file, locate this code segment:
<Connector port="8080"
relaxedPathChars="[]|"
relaxedQueryChars="[]|{}^\`"<>"
maxThreads="150"
minSpareThreads="25"
connectionTimeout="20000"
enableLookups="false"
maxHttpHeaderSize="8192"
protocol="HTTP/1.1"
useBodyEncodingForURI="true"
redirectPort="8443"
acceptCount="100"
disableUploadTimeout="true"/>And add the proxyName and proxyPort elements (replacing them with the appropriate properties), and another connector below – this is used for troubleshooting to bypass the proxy:
<!-- Nginx Proxy Connector without https scheme -->
<Connector port="8080"
relaxedPathChars="[]|"
relaxedQueryChars="[]|{}^\`"<>"
maxThreads="150"
minSpareThreads="25"
connectionTimeout="20000"
enableLookups="false"
maxHttpHeaderSize="8192"
protocol="HTTP/1.1"
useBodyEncodingForURI="true"
redirectPort="8443"
acceptCount="100"
disableUploadTimeout="true"
proxyName="www.atlassian.com"
proxyPort="80"/>
<!-- OPTIONAL,Nginx Proxy Connector with https scheme-->
<Connector port="8081"
relaxedPathChars="[]|"
relaxedQueryChars="[]|{}^\`"<>"
maxThreads="150"
minSpareThreads="25"
connectionTimeout="20000"
enableLookups="false"
maxHttpHeaderSize="8192"
protocol="HTTP/1.1"
useBodyEncodingForURI="true"
redirectPort="8443"
acceptCount="100"
disableUploadTimeout="true"
proxyName="www.atlassian.com"
proxyPort="443"
scheme="https"
secure="true"/>
<!-- Standard HTTP Connector without any proxy config -->
<Connector port="8082"
relaxedPathChars="[]|"
relaxedQueryChars="[]|{}^\`"<>"
maxThreads="150"
minSpareThreads="25"
connectionTimeout="20000"
enableLookups="false"
maxHttpHeaderSize="8192"
protocol="HTTP/1.1"
useBodyEncodingForURI="true"
redirectPort="8443"
acceptCount="100"
disableUploadTimeout="true"/>Configure Nginx reverse Proxy
Install Nginx.
apt install nginxThe web server should already be up and running at the end of the installation process. We can check with the systemd init system to make sure the service is running by typing:
systemctl status nginxRemove default Nginx configuration.
rm -rf /etc/nginx/sites-available/default
rm -rf /etc/nginx/sites-enabled/default
Create a new configuration file for Jira.
nano /etc/nginx/sites-available/jira.confAdd the following configurations.
server {
     listen [::]:80;
     listen 80;

     server_name jira-sub_domain.com;

     location / {
         proxy_set_header X-Forwarded-Host $host;
         proxy_set_header X-Forwarded-Server $host;
         proxy_set_header X-Forwarded-For $proxy_add_x_forwarded_for;
         proxy_pass http://localhost:8080;
         client_max_body_size 10M;
     }
}
Hit Ctrl+X followed by Y and Enter to save the file and exit.
To enable this newly created website configuration, symlink the file that you just created into the sites-enabled directory.
ln -s /etc/nginx/sites-available/jira.conf /etc/nginx/sites-enabled/jira.confCheck your configuration and restart Nginx for the changes to take effect.
nginx -tservice nginx restartGenerating an Origin CA TLS Certificate
The Cloudflare Origin CA lets you generate a free TLS certificate signed by Cloudflare to install on your Nginx server. By using the Cloudflare generated TLS certificate you can secure the connection between Cloudflare’s servers and your Nginx server.
To generate a certificate with Origin CA, log in to your Cloudflare account in a web browser. Select the domain that you want to secure, from the left menu, navigate to the SSL/TLS > Origin Server, and click on the Create Certificate button:

Leave the default option of Generate private key and CSR with Cloudflare selected. Choose the valid duration for certificate (default 15 years), then click on Create.
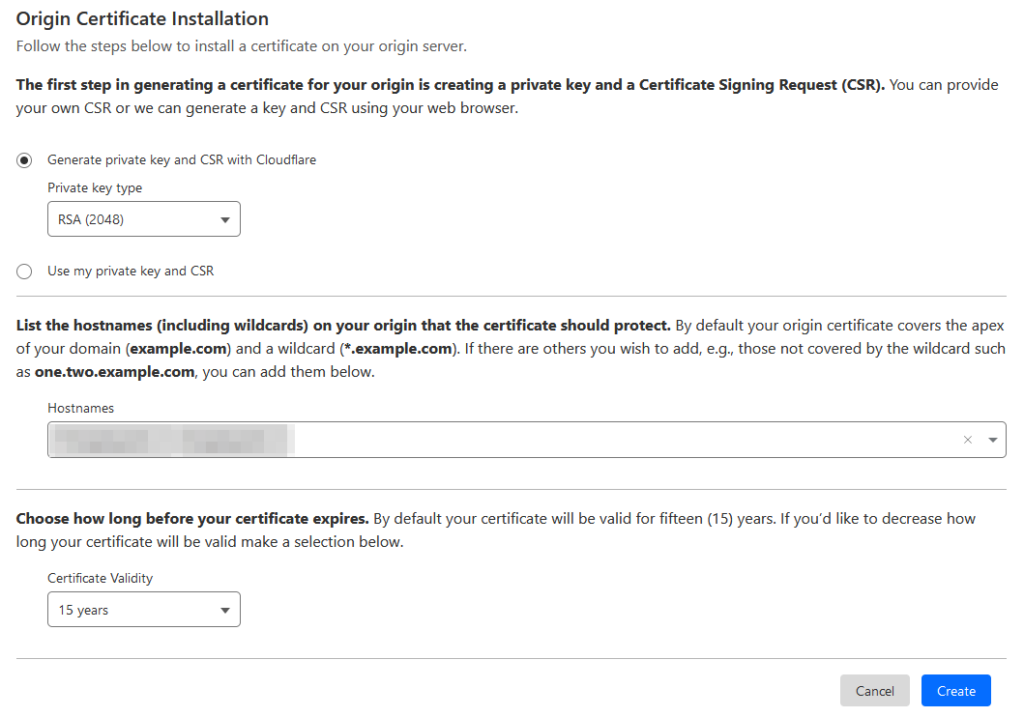
You will see a dialog with the Origin Certificate and Private key. You need to transfer those from Cloudflare to your server. For security reasons, the Private Key information will not be displayed again, so copy the key to your server before clicking Ok.
You can use the /etc/ssl directory on the server to hold the origin certificate and the private key files.
First, copy the contents of the Origin Certificate displayed in the dialog box in your browser. Then, on your server, open /etc/ssl/cert.pem in your preferred text editor:
nano /etc/ssl/cert.pemPaste the certificate contents into the file. Then save and exit the editor. If you are using nano, press Ctrl+X, then when prompted, Y and then Enter.
Then return to your browser and copy the contents of the Private key. Open the file /etc/ssl/key.pem for editing:
nano /etc/ssl/key.pemPaste the private key into the file, save the file, and exit the editor.
Note: Sometimes, when you copy the certificate and key from the Cloudflare dashboard and paste it into the relevant files on the server, blank lines are inserted. Nginx will treat such certificates and keys as invalid, so ensure that there are no blank lines in your files.
Warning: Cloudflare’s Origin CA Certificate is only trusted by Cloudflare and therefore should only be used by origin servers that are actively connected to Cloudflare. If at any point you pause or disable Cloudflare, your Origin CA certificate will throw an untrusted certificate error.
Now that you copied the key and certificate files to your server, you need to update the Nginx configuration to use them.
Redirect HTTP Traffic to HTTPS
Open your site’s Nginx configuration file add replace everything with the following. Replacing the file path with the one you received when obtaining the SSL certificate. The ssl_certificate directive should point to your cert.pem file, and the ssl_certificate_key directive should point to your key.pem file.
server {
     listen [::]:80;
     listen 80;

     server_name jira-sub_domain.com;

     return 301 https://jira-sub_domain.com$request_uri;
}

server {
     listen [::]:443 ssl;
     listen 443 ssl;

     server_name jira-sub_domain.com;

     ssl_certificate /etc/ssl/cert.pem;
     ssl_certificate_key /etc/ssl/key.pem;

     location / {
         proxy_set_header X-Forwarded-Host $host;
         proxy_set_header X-Forwarded-Server $host;
         proxy_set_header X-Forwarded-For $proxy_add_x_forwarded_for;
         proxy_pass http://localhost:8080;
         client_max_body_size 10M;
     }
}
Hit CTRL+X followed by Y to save the changes.
Check your configuration and restart Nginx for the changes to take effect.
nginx -t
service nginx restart
Reference
[1] https://www.cloudbooklet.com/install-jira-on-ubuntu-with-nginx-rds-and-letsencrypt-ssl-aws/